Learning how to fix a car’s plastic bumper damage is simpler than it seems if you follow the right steps. Minor dents can be softened with a heat gun and pushed back into shape, while cracks can be repaired using plastic welding with a soldering iron and polypropylene filler rod, or a specialized two-part plastic adhesive.
For smaller cosmetic issues like scratches or bubbling, proper cleaning, sanding, and using an adhesion promoter with flexible plastic repair material ensures a smooth, long-lasting finish. A simple trick to prevent cracks from spreading is to drill a small hole at the end of the crack, a classic fiberglass method. By doing these repairs yourself, you can reduce plastic bumper repair cost and avoid high car bumper crack repair cost, making DIY bumper repair both effective and budget-friendly.
Plastic Bumper Damage
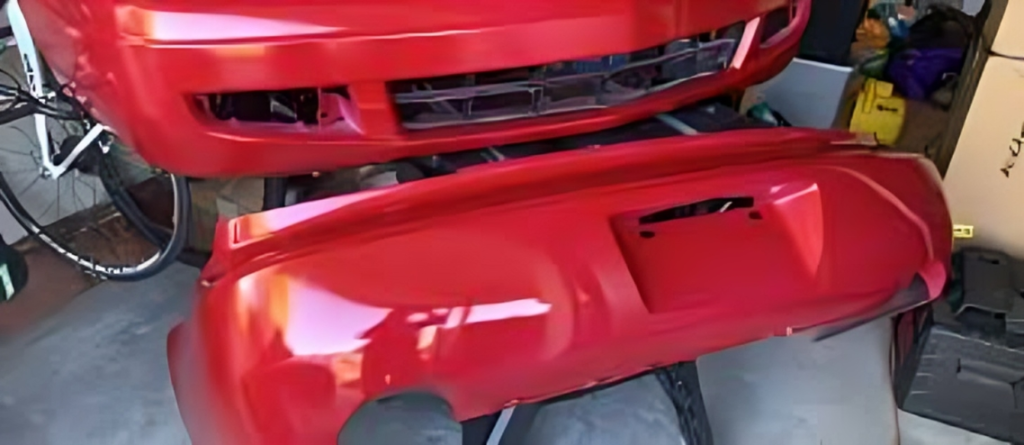
Plastic bumpers are designed to absorb impacts and protect your car, but they are still susceptible to various types of damage over time. The most common issues include scratches, cracks, and dents. Scratches are usually superficial and affect only the surface paint or clear coat. While they may look unsightly, they often do not compromise the structural integrity of the bumper and can be repaired easily with polishing or touch-up paint.
Cracks are more serious, as they how much does a new bumper cost indicate that the bumper material has been compromised. Small cracks might be repairable at home using a plastic bumper crack repair kit, which often includes adhesives, fillers, and tools specifically designed for fixing plastic panels. Larger cracks or cracks that penetrate the bumper fully may require professional attention to ensure proper alignment and strength.
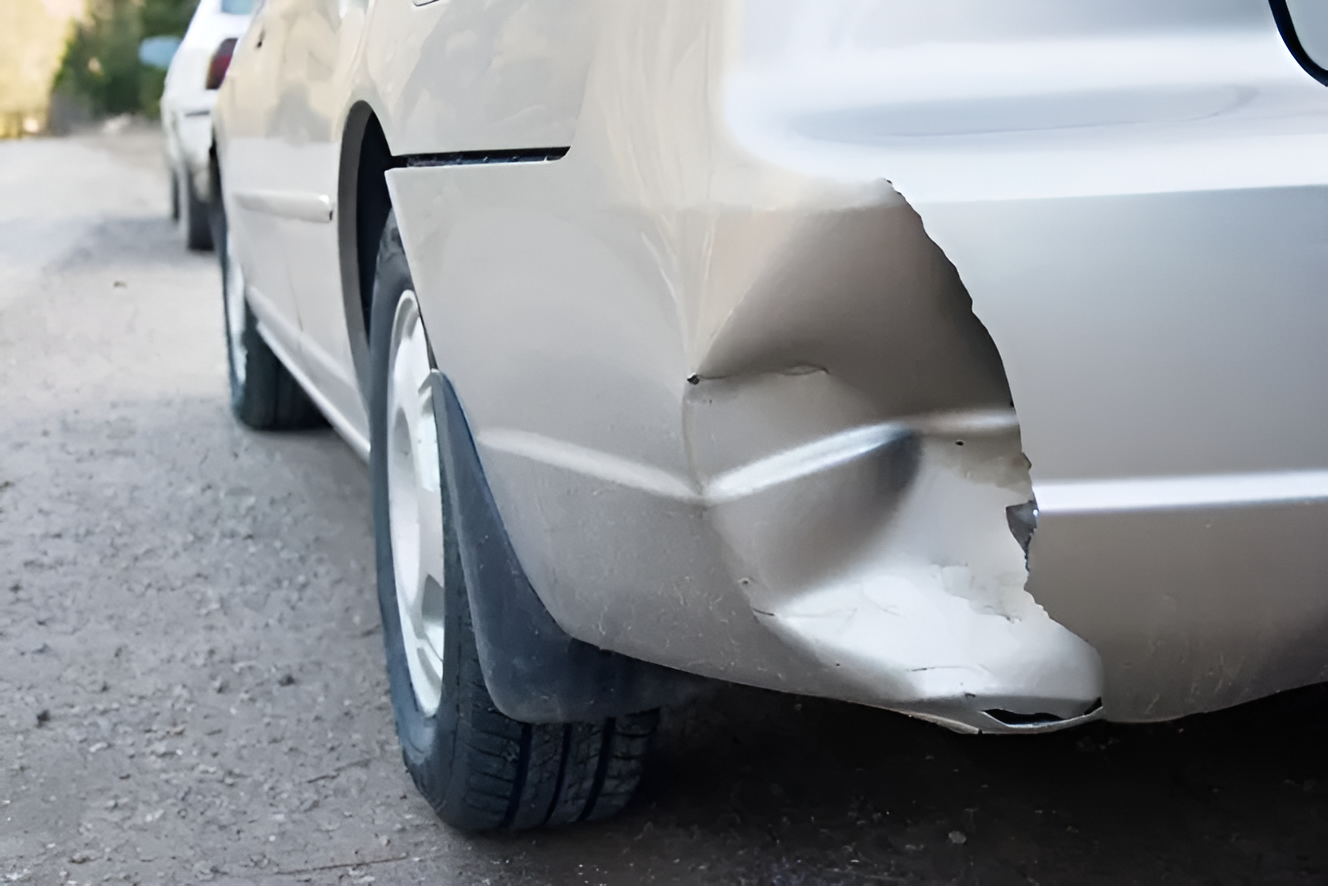
Dents occur when an impact pushes the plastic inward. Depending on the severity, dents can sometimes be popped back into shape using heat, such as a heat gun, to soften the plastic and allow it to be reshaped.
It’s also important to distinguish between minor cracks and major damage. Minor cracks are typically shallow, affecting only the surface and are easy to repair, while major damage involves deeper splits, multiple cracks, or structural weakness that may require plastic welding or replacement. Understanding these differences is crucial to choosing the right repair method and tools, preventing further deterioration, and keeping plastic bumper repair costs manageable.
Tools and Materials You’ll Need
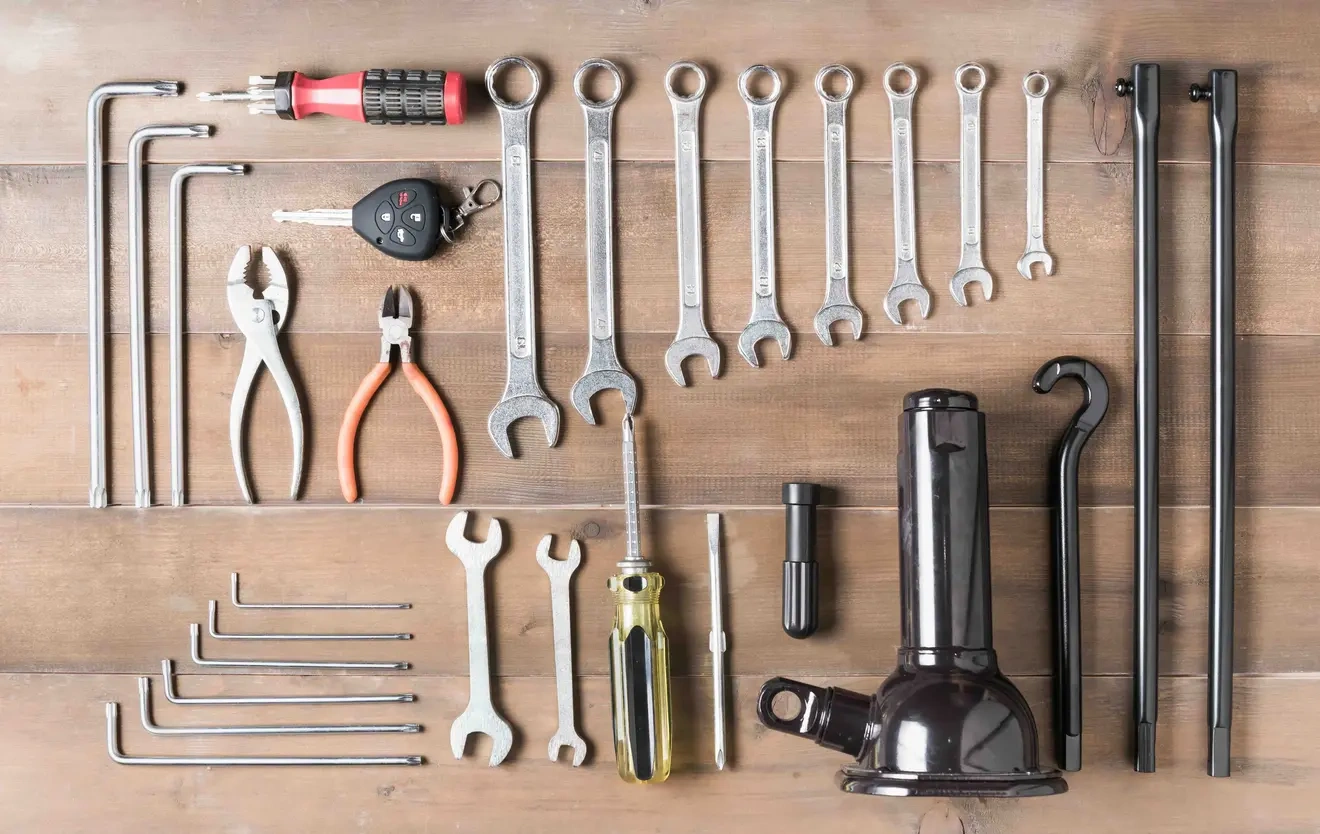
Repairing a damaged plastic bumper requires the right tools and materials to ensure a smooth, durable finish. One of the most essential items is a plastic bumper repair kit, which usually includes adhesives, fillers, and basic tools designed specifically for plastic repair. These kits simplify the repair process, especially for DIY enthusiasts who want to fix minor cracks and dents at home.
Another key material is plastic bumper filler. This is used to fill small cracks, scratches, or surface imperfections, creating a smooth surface ready for sanding and painting. Using the proper filler ensures that repairs blend seamlessly with the rest of the bumper and remain durable over time.
You will also need basic tools such as sandpaper and a putty knife. Sandpaper is important for preparing the damaged area by smoothing rough edges and ensuring proper adhesion of fillers or adhesives. A putty knife helps spread filler evenly across the surface, avoiding lumps or uneven patches.
For small cracks, superglue or car bumper repair glue can be extremely effective. These adhesives bond the plastic quickly and firmly, making them ideal for minor repairs without the need for full disassembly.
Optional items like masking tape and paint allow for finishing touches, ensuring the repaired area matches the rest of the bumper. By gathering these tools and materials, you can reduce plastic bumper repair costs and achieve professional-looking results at home, saving both time and money.
Step-by-Step Guide to Fix a Cracked Bumper
Repairing a plastic bumper may seem challenging, but following a structured approach makes it manageable. From cleaning the damaged area to applying fillers and adhesives, these steps will guide you in fixing cracks effectively while reducing plastic bumper repair costs.
Step 1: Clean the Damaged Area
The first and most important step in repairing a cracked bumper is thorough cleaning. Dirt, grease, and debris on the damaged surface can prevent adhesives or fillers from bonding properly, leading to a weak repair. Begin by washing the bumper with mild soap and warm water, scrubbing gently to remove surface grime. For stubborn grease or oil, rubbing alcohol or a degreasing solution can be applied to ensure the area is completely clean.
After washing, dry the bumper thoroughly with a clean microfiber cloth. Ensure there is no moisture trapped in the crack, as this can interfere with plastic welding, fillers, or glue. If you are using a plastic bumper crack repair kit, most kits emphasize that cleaning is crucial for optimal adhesion. Proper preparation at this stage not only strengthens the repair but also ensures a smoother finish when sanding and painting later.
By taking the time to clean the damaged area carefully, you set a solid foundation for all subsequent steps, whether you are using plastic bumper filler or car bumper repair glue. Skipping this step can compromise the repair, increasing the risk of further damage and higher car bumper crack repair costs.
Step 2: Assess the Crack
After cleaning the damaged area, the next step is to carefully assess the crack. Not all bumper cracks are the same, and understanding their size, depth, and location will help determine the best repair approach. Small surface cracks on the outer layer can often be repaired without removing the bumper, while larger cracks or splits that extend through the plastic may require more extensive work.
If you notice that the crack is minor and the bumper is still firmly attached to the car, you can proceed with a DIY repair. This is where knowing how to fix a cracked bumper without removing it becomes important. Repairing the bumper in place saves time, reduces hassle, and avoids additional labor like detaching and remounting the bumper.
Examine the crack under good lighting, and gently flex the bumper to see if the crack widens or shifts. If the crack is stable, you can move forward with filling, gluing, or plastic welding. However, if the plastic feels weak or the crack is extensive, consider professional guidance to ensure the repair holds.
Properly assessing the crack ensures that you choose the most effective repair method, reduces the risk of future damage, and allows a smoother, long-lasting fix for your plastic bumper.
Step 3: Apply Plastic Bumper Filler
Once you have cleaned and assessed the crack, it’s time to repair it using a plastic bumper filler. This step is essential for creating a smooth, even surface and restoring the bumper’s original shape. Begin by mixing the filler according to the instructions provided in your repair kit. Proper consistency is crucial to ensure that the filler adheres well and does not shrink as it dries.
Carefully apply the filler directly into the crack using a putty knife. Press it firmly to fill the entire depth of the crack and smooth out excess material. Take your time to ensure the surface is as even as possible, as this will make sanding and finishing easier later. For larger cracks, multiple layers of filler may be required, allowing each layer to dry fully before applying the next.
Drying time can vary depending on the type of filler and ambient temperature, so follow the manufacturer’s guidelines for optimal results. Once dry, lightly sand the repaired area to achieve a smooth finish, ready for painting or adhesive application.
Using a plastic bumper filler is a cost-effective and practical way to repair minor damage. With proper technique, this step allows anyone to repair a car bumper crack at home, saving both time and money while achieving professional-looking results.
Step 4: Use Superglue or Car Bumper Repair Glue
For smaller cracks that do not require full filler application, using superglue or car bumper repair glue can be a quick and effective solution. This method is especially useful for minor splits on the surface of the bumper, where the plastic still maintains structural integrity. Knowing how to fix a cracked plastic bumper with superglue ensures that the repair is both strong and clean.
To start, make sure the cracked area is completely clean and dry. Apply a thin layer of glue along the length of the crack, pressing the plastic edges together firmly. Some adhesives may require holding the pieces in place for a few minutes or using masking tape to secure them while curing. Follow the manufacturer’s instructions regarding drying time to ensure maximum adhesion.
Once the glue has fully dried, lightly sand the repaired area using fine-grit sandpaper. This removes any excess glue and creates a smooth, even surface. After sanding, you can apply car bumper repair glue again if needed to fill small gaps, then finish with another round of sanding to prepare for painting or final finishing.
This method provides a strong, long-lasting repair for minor cracks while saving time and avoiding the need for complex tools. With proper application, you can achieve professional-looking results quickly and effectively.
Step 5: Sand and Paint (Optional)
After repairing cracks or dents with a plastic bumper filler or car bumper repair glue, sanding and painting is the final step to achieve a smooth, professional-looking finish. Begin by sanding the repaired area evenly using fine-grit sandpaper. This process helps to remove any rough edges, excess filler, or dried glue, ensuring that the surface is perfectly level with the rest of the bumper. Proper sanding also improves adhesion for primer and paint.
Once the area is smooth, apply a thin layer of primer if you plan to paint the bumper. Primer not only improves paint adhesion but also helps prevent future cracking and fading, extending the life of the repair. After the primer dries, lightly sand again to remove minor imperfections before applying the paint. Use paint that matches your car’s color for a seamless finish. Multiple thin coats are better than one thick coat, as they reduce the risk of drips and uneven texture.
Finally, allow the paint to dry completely and, if needed, apply a clear coat for extra shine and protection. By carefully sanding and painting, you can restore your bumper’s appearance, making it look as good as new. This step ensures that your DIY repair not only fixes the damage but also maintains the aesthetic quality of your vehicle.
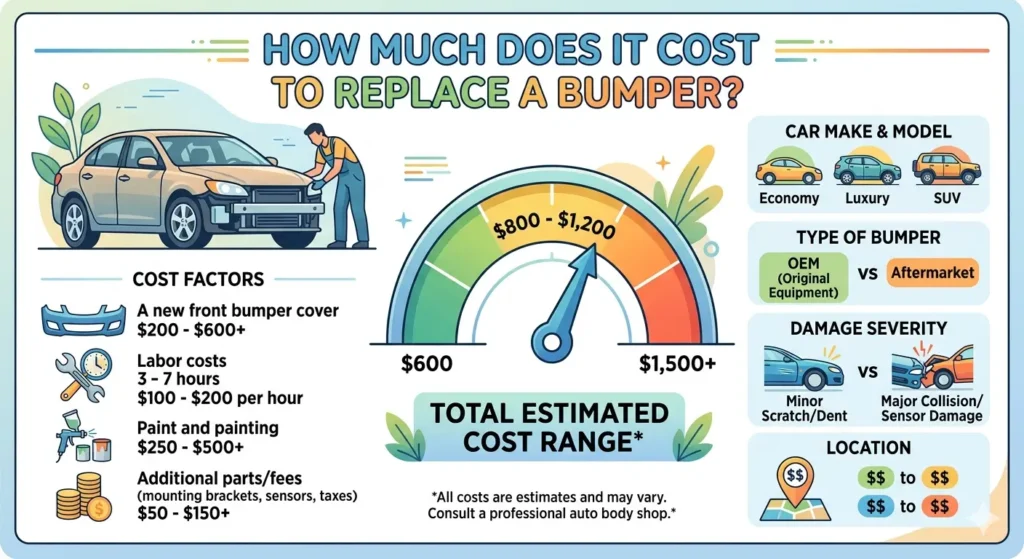
Cost of Plastic Bumper Repair
When it comes to fixing a damaged plastic bumper, understanding the cost of repair is important for deciding between a DIY approach and professional service. The cost of repairing a plastic bumper can vary widely depending on the extent of the damage and the chosen repair method.
For minor cracks, dents, or scratches, DIY repair is often the most cost-effective option. Using a plastic bumper repair kit, filler, and adhesives allows car owners to fix small issues at home, typically spending only $20–$50 on materials. This not only reduces expenses but also saves time compared to taking the vehicle to a workshop. Minor cosmetic repairs, when done properly, can restore the bumper’s appearance without compromising its durability.
Professional repair, on the other hand, is usually recommended for major damage, such as deep cracks, splits that penetrate the bumper, or extensive dents. These repairs may involve plastic welding, full panel replacement, or painting, which increases labor costs. On average, the car bumper crack repair cost for professional services can range from $150 to $600 or more, depending on the vehicle model and the severity of the damage.
By comparing DIY and professional options, car owners can make informed decisions. Minor damage is often manageable at home, saving both money and effort, while serious cracks may require professional expertise to ensure safety and long-term durability. Proper assessment and repair planning directly impact the overall cost and outcome.
How Do You Repair a Broken Plastic Car Bumper
Repairing a broken plastic car bumper is a manageable task when you have the right tools, materials, and a clear step-by-step process. Based on real-world automotive experience, here is a practical and honest guide to help you restore your bumper confidently.
Step 1: Assess the Damage Start by inspecting the bumper carefully. Small cracks, splits, and broken tabs are repairable at home. Severely shattered or structurally compromised bumpers usually require full replacement for safety reasons.
Step 2: Clean the Damaged Area Wash the damaged area thoroughly with soap and water. Remove all dirt, grease, and wax around the crack before starting any repair work. A clean surface ensures better adhesion and a stronger repair.
Step 3: Use a Plastic Bumper Repair Kit Purchase a quality plastic bumper repair kit from a trusted auto parts store. These kits typically include plastic filler, adhesive, fiberglass mesh, sandpaper, and mixing tools needed for a professional finish.
Step 4: Apply Plastic Filler or Adhesive For cracks, apply plastic adhesive or filler directly into the damaged area. Use fiberglass mesh tape on the back side of the bumper for added strength and structural support before applying filler to the front.
Step 5: Sand and Shape the Repair Once the filler dries completely, sand the repaired area smooth using progressively finer sandpaper grits. Start with 80 grit and finish with 400 grit for a surface ready for painting.
Step 6: Prime and Paint Apply automotive primer, let it dry, then paint the repaired area to match your vehicle’s color. Use a clear coat finish to protect the repair and blend it seamlessly with the surrounding bumper surface.
How Do You Repair Plastic Car Bumpers
Repairing plastic car bumpers is a skill any motivated car owner can learn with the right tools and guidance. Based on hands-on automotive experience, here is a straightforward and reliable process to help you restore your bumper effectively and affordably.
Step 1: Identify the Type of Damage Before starting any repair, carefully examine the bumper. Surface scratches, minor cracks, and small splits are ideal candidates for DIY repair. Deep gouges, large cracks, or severely broken bumpers may require professional attention or full replacement.
Step 2: Clean the Bumper Thoroughly Wash the entire bumper with soap and water, then degrease the damaged area with isopropyl alcohol. Removing all dirt, wax, and contaminants ensures the repair materials bond properly and last longer.
Step 3: Choose the Right Repair Materials Visit a trusted auto parts store and pick up a plastic bumper repair kit. Quality kits include plastic adhesive, body filler, fiberglass mesh, mixing sticks, and sandpaper for a complete professional-grade repair.
Step 4: Reinforce the Back Side First For cracks and splits, always reinforce the inside of the bumper first. Apply fiberglass mesh tape and plastic adhesive to the back surface, creating a strong structural foundation before filling the front side.
Step 5: Apply and Shape the Filler Apply plastic body filler to the front of the damaged area, slightly overfilling the crack. Once fully cured, sand the repair smooth using 80 grit sandpaper first, then finishing with 220 and 400 grit for a clean, paint-ready surface.
Step 6: Prime, Paint, and Clear Coat Apply an automotive primer coat and allow it to dry fully. Then paint the repaired area using a color-matched automotive spray paint. Finish with a clear coat layer to seal and protect the repair while blending it naturally with the surrounding bumper.
Tips for Preventing Future Bumper Damage
Once your plastic bumper is repaired, taking preventive measures can help avoid future damage and extend the life of your repair. One of the most effective steps is to drive carefully and avoid tight spaces. Slow, cautious driving reduces the risk of minor collisions with curbs, poles, or other vehicles, which are common causes of scratches, dents, and cracks. Always maintain a safe distance from other cars and obstacles, especially in parking lots or narrow streets.
Another useful measure is to use protective covers or bumper guards. These accessories provide an extra layer of protection, absorbing impacts from minor bumps and preventing scratches from everyday use. Magnetic or adhesive bumper guards are easy to install and can be removed without damaging the paint, while full bumper covers offer more comprehensive protection for your car’s front and rear ends.
Regular inspection and maintenance also help detect small cracks or scratches early, allowing you to repair them before they worsen. Combining careful driving with protective measures helps keep your plastic bumper in good condition, reducing the need for frequent repairs and saving you time and money in the long run.
Conclusion
Repairing your car’s plastic bumper doesn’t have to be expensive or complicated. By following step-by-step methods, including cleaning, assessing cracks, applying plastic bumper filler, using superglue or car bumper repair glue, and sanding or painting, you can successfully fix a car’s plastic bumper damage at home. Proper tools, careful technique, and preventive measures help ensure a long-lasting, professional-looking result. Start your DIY repair today and save both time and money while keeping your bumper in excellent condition.
FAQ
Can a damaged plastic bumper be repaired?
Yes, a damaged plastic bumper can be repaired depending on the type of damage. Minor dents, cracks, and scratches can be fixed at home using fillers, adhesives, and proper tools. Following step-by-step guidance on how to fix a car’s plastic bumper damage ensures a strong and lasting repair.
Can you fix a plastic bumper without removing it?
Absolutely! Many minor cracks and scratches can be repaired in place. Knowing how to fix a car’s plastic bumper damage without removing it saves time, avoids complicated disassembly, and allows a DIY repair using fillers or glue.
Can I repair my car bumper myself?
Yes, DIY repair is possible. With the right materials like a plastic bumper repair kit, plastic filler, and adhesives, you can confidently fix a car’s plastic bumper damage at home while saving money on professional services.
Can a scraped plastic bumper be repaired?
Scraped bumpers can usually be repaired by cleaning the area, sanding, and applying filler or paint. Following detailed instructions on how to fix a car’s plastic bumper damage ensures the surface looks smooth and restores the bumper’s appearance.
Can I use JB Weld to fix my bumper?
JB Weld is a strong adhesive that can work for certain plastic bumper cracks. However, it’s best to follow proper techniques outlined in guides on how to fix a car’s plastic bumper damage to ensure correct application and long-lasting results.
Does WD-40 remove scratches?
WD-40 can temporarily make scratches less visible by lubricating the surface, but it does not repair them. For a permanent fix, you should follow proper steps on how to fix a cars plastic bumper damage, using fillers, sanding, and paint.
Is it worth repairing a plastic bumper?
Yes, repairing a plastic bumper is often cost-effective and preserves your car’s appearance. Learning how to fix a car’s plastic bumper damage allows you to handle minor cracks, how to fix a cars plastic bumper damage, dents, and scratches yourself, saving money compared to professional repair.