It’s a moment every driver dreads you’re cruising down the highway when you notice the temperature gauge creeping steadily toward the red zone, or worse, the “Coolant Low” warning light flashes onto your dashboard. That sudden spike of adrenaline is what we call the “Rising Needle Panic.”
At this moment, your car isn’t just a machine; it’s a ticking clock. Engine coolant is the lifeblood of your vehicle, responsible for regulating the immense heat generated by internal combustion. Ignoring that needle can lead to warped cylinder heads or a seized block—repairs that can easily cost upwards of $5,000. However, knowing how to add engine coolant to car systems is a simple, five-minute task that can save your engine and your wallet.
The “Golden Rule” of Cooling Systems
Before you even reach for a bottle of antifreeze, we need to talk about the most important part of learning how to add engine coolant to car reservoirs: your personal safety. If you approach a cooling system with the same casual attitude you’d use to check your oil, you are entering the Danger Zone.
The Pressure Cooker Under Your Hood
Think of your car’s cooling system as a giant industrial pressure cooker. When your engine is running—or even if it’s been turned off for just ten minutes—the coolant inside is under immense pressure and is heated well beyond the boiling point of water.
If you unscrew the radiator or reservoir cap while the system is still hot, that pressure is released instantly. The result isn’t just a splash; it’s a violent eruption of scalding steam and boiling chemical fluid. This can cause severe, life-altering third-degree burns to your face, hands, and chest in a fraction of a second. At MitsubishiAutoStore.com, we want your car to run perfectly, but we want you to stay safe even more.
How to Add Coolant to Your Car
Adding coolant to your car is a simple but important maintenance task that keeps your engine running at a safe temperature. Based on hands-on automotive experience, following the correct steps ensures your cooling system stays healthy and your engine stays protected.
Step 1: Let the Engine Cool Down Never open the coolant reservoir or radiator cap on a hot engine. Always wait at least 30 minutes after driving before touching anything in the cooling system to avoid serious burns from pressurized steam.
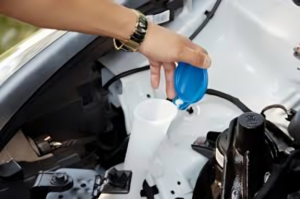
Step 2: Locate the Coolant Reservoir Open your hood and find the coolant reservoir tank. It is usually a translucent white plastic container with a colored cap marked with a temperature warning symbol. Check your owner’s manual if you are unsure.
Step 3: Check the Coolant Level Look at the side of the reservoir for the minimum and maximum fill lines. If the coolant sits below the minimum line, it is time to add more.
Step 4: Choose the Right Coolant Always use the coolant type recommended in your owner’s manual. Using the wrong coolant can damage seals, hoses, and internal engine components over time.
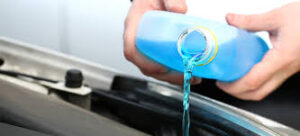
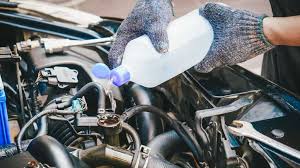
Step 5: Add Coolant Slowly Pour coolant carefully into the reservoir until it reaches the maximum fill line. Never overfill. Replace the cap securely when finished.
The Wait Time: Patience is a Virtue
This is where the “Golden Rule” comes in: Never, under any circumstances, open a cooling system while the engine is hot. * The 60-Minute Standard: You must wait at least 30 to 60 minutes after turning off the engine before you attempt to open the cap.
- The Touch Test: A good rule of thumb is to touch the hood or the upper radiator hose (carefully!). If it feels uncomfortably hot to your hand, the fluid inside is definitely too hot to open.
- The Pressure Check: Even after waiting, always use a thick rag to slowly twist the cap just a quarter turn. If you hear a “hiss” like a soda bottle opening, stop, wait another ten minutes, and let that residual pressure bleed off safely.
Taking those extra 45 minutes to let things cool down might feel like a nuisance when you’re in a hurry, but it’s the difference between a successful DIY fix and a trip to the emergency room. Once the system is cool and the pressure is gone, you’re ready to move on to selecting the right fluid and getting your levels back to where they belong.
Identifying the Right “Juice”: More Than Just Colored Water
Once your engine has finally cooled down, the next hurdle is picking the right fluid. A common mistake many drivers make is assuming that all “antifreeze” is created equal. However, pouring the wrong chemical cocktail into your radiator can lead to a “gel” reaction that clogs your engine’s internal veins. If you want to master how to add engine coolant to car systems correctly, you have to know what you’re pouring.
How to Put Engine Coolant in a Car
Putting engine coolant in your car is one of the easiest maintenance tasks you can do at home. Based on real-world automotive experience, doing it correctly protects your engine from overheating and costly damage down the road.
Step 1: Park and Let the Engine Cool Always start with a cold engine. Park your car on a flat surface and wait at least 30 minutes after driving before opening anything under the hood. A hot cooling system is pressurized and can cause serious burns.
Step 2: Open the Hood and Find the Reservoir Locate the coolant reservoir under the hood. It is typically a translucent plastic tank with MIN and MAX markings on the side and a colored cap with a temperature warning symbol.
Step 3: Check the Current Level Look at the side markings on the reservoir. If the coolant level sits below the MIN line, your car needs coolant added immediately.
Step 4: Use the Correct Coolant Type Check your owner’s manual for the recommended coolant specification. Using the wrong type can damage hoses, seals, and internal engine components over time.
Step 5: Pour Coolant Into the Reservoir Slowly pour the correct coolant into the reservoir until it reaches the MAX fill line. Avoid overfilling as this can cause pressure buildup in the system.
Step 6: Secure the Cap and Close the Hood Replace the reservoir cap firmly and close the hood completely before starting your engine.
Not All Coolants Are Equal
Modern engines use different metal alloys and gasket materials, each requiring specific chemical protection. You’ll generally run into three main types:
- IAT (Inorganic Additive Technology): The traditional stuff, usually green, found in older vehicles.
- OAT (Organic Acid Technology): Typically orange or red, designed for long-life protection in newer models.
- HOAT (Hybrid OAT): A “best of both worlds” formula, often yellow or blue, frequently used by Asian and European manufacturers.
The Color Trap
Here is a professional secret: Never rely on color alone. While colors used to be a reliable shorthand, today’s manufacturers use various dyes that can be misleading. A “blue” coolant from one brand might have a completely different chemical makeup than a “blue” from another. The only 100% reliable way to ensure compatibility is to check your owner’s manual or look for the specific manufacturer’s approval on the bottle. At MitsubishiAutoStore.com, we always recommend using Genuine Mitsubishi Super Long Life Coolant to ensure your water pump and seals stay lubricated.
Concentrate vs. 50/50 Premix
When you’re at the store, you’ll see two types of bottles.
- 50/50 Premix: This is “ready to pour.” It’s the most convenient option because the math is already done for you.
- Concentrate: This is pure antifreeze. Never pour 100% concentrate into your car. It must be mixed with 50% distilled water.
Pro Tip: Always use distilled water, not tap water. Tap water contains minerals like calcium and magnesium that can create “scale” buildup inside your radiator, eventually leading to the very overheating you’re trying to prevent.
By taking a moment to identify the right “juice,” you aren’t just topping off a tank—you’re performing vital maintenance that keeps your car on the road for years to come.
Step-by-Step: Adding Coolant Like a Pro
Now that your engine is cool and you’ve selected the correct fluid, it’s time for the main event. Learning how to add engine coolant to car systems is a straightforward process, but precision matters. Following these four steps ensures you get the job done without making a mess or damaging your engine.
Step 1: The Location
Open your hood and look for the coolant expansion tank (also called a recovery reservoir). This is usually a translucent plastic tank located near the radiator. It will have a hose connecting it to the radiator itself.
Important Note: On most modern vehicles, you should add coolant directly to this plastic tank, not the metal radiator cap. Only open the radiator cap if the reservoir is empty or if your specific car manual instructs you to do so.
Step 2: Checking the Lines
On the side of the translucent tank, you will see molded markings. These are usually labeled “Min” and “Max” or “Low” and “Full.” * If the fluid level is at or below the “Min” line while the engine is cold, you need to add more.
Do not overfill. Leaving space between the fluid and the top of the tank is essential because coolant expands as it heats up. If there’s no room for expansion, the pressure could blow the cap or crack the tank.
Step 3: The Slow Pour
Unscrew the reservoir cap slowly. Use a clean funnel to ensure every drop goes exactly where it belongs. This isn’t just about being neat—coolant is slippery and corrosive to certain engine components. Spilling it on your serpentine belt or drive belts can cause them to slip or degrade prematurely. Pour the 50/50 mixture slowly until the level hits the “Max” line.
Step 4: The Seal
Once you’ve reached the correct level, remove the funnel and wipe away any stray drops with a rag. Replace the cap and turn it clockwise. Most modern caps are designed to “click” or reach a very firm stopping point. This seal is vital; if the cap isn’t tight, the system won’t be able to build the pressure required to keep your engine cool during your next drive.
Troubleshooting: Why is the Level Low?
If you find yourself constantly searching for how to add engine coolant to car reservoirs every few weeks, you aren’t just performing maintenance—you’re managing a symptom of a larger problem. Your car’s cooling system is a sealed system. Unlike fuel, coolant shouldn’t just “burn off” through normal operation. If the level is dropping, the fluid is escaping somewhere, and finding that “somewhere” is the key to preventing a roadside breakdown.
The “Sealed System” Reality
Under perfect conditions, the coolant level in your expansion tank should remain relatively consistent between service intervals. If you find that the “Max” line has dropped to “Min” in a short period, you are likely dealing with a leak. This could be a “passive leak” (dripping while parked) or an “active leak” (spraying only when the system is hot and pressurized).
Visual Cues: The Trail of Crumbs
Fortunately, coolant is designed to be easy to track. Most antifreeze contains dyes that leave behind a telltale residue when they evaporate.
- The Crusty Clue: Look for white, green, or pink “crusty” buildup around hose clamps, the edges of the radiator, or the water pump. This is crystallized coolant marking the exact spot of a slow leak.
- The Puddle: A bright, sweet-smelling puddle under the front of your car is a dead giveaway.
- The Sweet Scent: If you smell something resembling maple syrup after a drive, but don’t see a leak, the coolant might be dripping onto a hot engine part and evaporating instantly.
Performance Notes: The Evo X & Ralliart Factor
If you drive a high-performance machine like the Mitsubishi Lancer Evolution X or a Ralliart, your cooling system is under significantly more stress than a standard sedan. Turbochargers generate extreme heat, and the 4B11T engine relies heavily on consistent thermal management to maintain boost and prevent knock.
For performance owners, checking coolant levels shouldn’t be a “once a year” task. High-revving engines and track days put immense pressure on plastic radiator end-tanks and rubber hoses. Frequent inspections ensure that a tiny hairline crack doesn’t turn into a catastrophic failure while you’re at wide-open throttle.
When to See a Professional: More Than Just a Top-Off
While knowing how to add engine coolant to car reservoirs is a vital DIY skill, there are moments when a bottle of antifreeze simply won’t fix the problem. Sometimes, the cooling system sends out distress signals that require a professional technician’s diagnostic tools and expertise. Ignoring these “red flags” can lead to the total loss of your engine.
The “Milkshake” Warning
One of the most ominous sights in automotive repair is the “milkshake.” When you open your coolant reservoir or your oil fill cap, the fluid should be clear and colorful (coolant) or amber/brown (oil). If, instead, you see a thick, frothy substance that looks like a chocolate milkshake, you are looking at a mixture of oil and coolant.
This is the classic symptom of a blown head gasket. When the gasket fails, the sealed passages for oil and coolant breach, allowing them to mix. This destroys the lubricating properties of your oil and the cooling properties of your antifreeze. If you see this, stop driving immediately. This is a high-priority repair that requires a professional teardown to save the engine block.
Bleeding the System: The “Burping” Process
Sometimes, even after you’ve learned how to add engine coolant to car tanks, your temperature gauge still fluctuates. This is often caused by an “air lock”—a bubble of air trapped deep within the engine’s cooling veins. Air doesn’t move heat as well as liquid does, which causes “hot spots” that can trigger an overheat warning even if your reservoir looks full.
“Bleeding” or “burping” the system involves running the engine with the cap off (using a specific funnel) to allow these bubbles to rise and escape. While some car enthusiasts do this at home, many modern vehicles have complex cooling loops and multiple bleed valves that are difficult to access. If your car continues to run hot despite having plenty of fluid, a professional “vacuum fill” or a manual system bleed is the only way to ensure 100% of that trapped air is gone.
Can I just use water if my coolant is low?
In an absolute emergency, yes—but only to get you to the nearest service station. Plain water has a lower boiling point and lacks the rust inhibitors found in antifreeze. If you use water, ensure it is distilled to avoid mineral buildup, and be sure to drain and refill the system with a proper 50/50 mix as soon as possible.
How do I know which coolant color to use?
Don’t rely solely on color! While many Asian vehicles use blue or pink, and older cars use green, the only way to be 100% sure is to check your owner’s manual. Mixing incompatible types (like OAT and IAT) can create a thick sludge that destroys your radiator.
Why is my car still overheating if the coolant reservoir is full?
This usually points to a trapped air bubble (“air lock”) in the system, a failing thermostat that won’t open, or a broken water pump. Even if you know how to add engine coolant to car reservoirs, these mechanical issues require professional diagnosis to ensure the fluid is actually circulating through the engine.
How often should I check my coolant levels?
You should check your reservoir at least once a month and before any long road trip. If you drive a high-performance vehicle like an Evo X, a quick weekly glance under the hood is a great habit to catch small leaks before they become big problems.
Is it safe to open the coolant cap if I use a rag?
Only if the engine is completely cool. Using a rag provides a better grip and protects you from minor splashes, but it will not stop a geyser of boiling steam if the system is still pressurized. Always wait at least 30–60 minutes after driving.
Conclusion
At its core, learning how to add engine coolant to car systems is one of the most empowering “quick fixes” a driver can master. It transforms a potentially terrifying dashboard warning light into a simple, five-minute maintenance task. By staying patient, waiting for the engine to cool, and using the right 50/50 mixture, you aren’t just topping off a plastic tank—you are actively extending the life of your vehicle and preventing costly mechanical failures down the road.
A well-maintained cooling system is the difference between a smooth summer road trip and a stressful afternoon waiting for a tow truck. Keep an eye on your levels, stay alert for those “maple syrup” smells, and never ignore a rising temperature needle.