How to Clean a Car Engine Like a Detailer
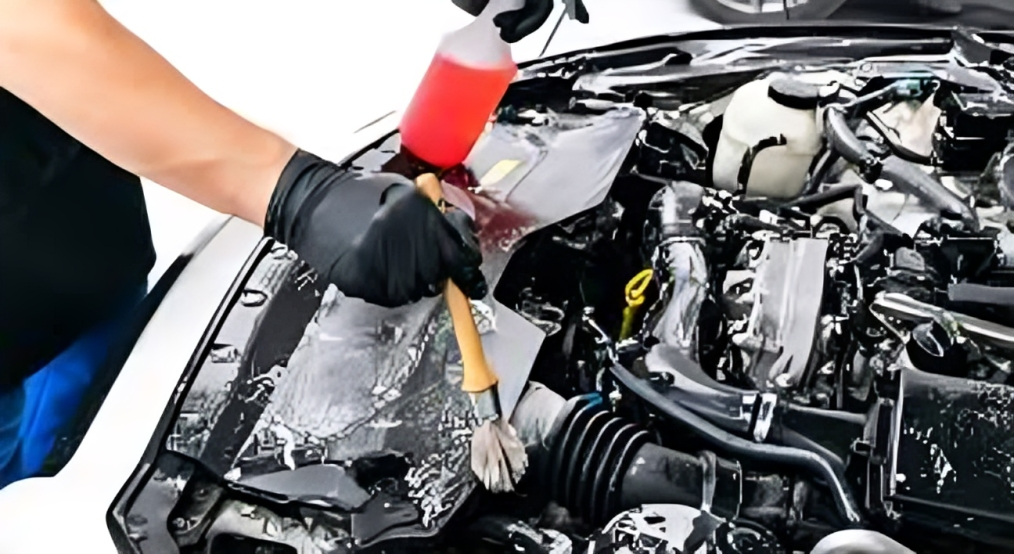
You spend hours washing the paint to a mirror finish and carefully waxing the hood until it glows, but have you looked at what’s lurking underneath? For most drivers, the engine bay is a “forgotten zone” filled with layers of dust, road salt, and baked-on grease. A dirty engine isn’t just an eyesore that ruins your car’s aesthetic; it can actually be a functional liability. Grime acts as an insulator, trapping heat around sensitive components, and thick layers of sludge can easily hide developing oil or coolant leaks that need your attention. There is a common myth that keeps many DIYers away: the fear that water and engines simply don’t mix. While it’s true that you shouldn’t go blasting your electronics with a high-pressure hose, learning how to clean a car engine safely is actually quite simple. When done with the right preparation, a “water-wise” cleaning is perfectly safe and incredibly rewarding. The payoff is twofold. First, a clean engine bay significantly increases your car’s resale value—nothing says “well-maintained” to a potential buyer like a spotless bay. Second, it makes routine maintenance a breeze; you’ll no longer finish a simple oil check covered in black soot. At MitsubishiAutoStore.com, we believe your car should look as good under the hood as it does on the highway. Let’s get that hidden showroom shine back. Shielding the Sensitive Bits Before you reach for the hose, you need a game plan. Knowing how to clean a car engine isn’t just about removing dirt; it’s about protecting the sophisticated technology that keeps your vehicle moving. Think of this stage as “pre-flight prep”—get it right, and the rest is smooth sailing. The “Cold Start” Rule The most common mistake beginners make is opening the hood after a long drive and spraying down the engine while it’s still sizzling. This is a recipe for disaster. Spraying cold water on a hot engine block can cause thermal shock, leading to warped components or even hairline fractures in the metal. Ideally, you want the engine to be cool to the touch or only slightly warm. A lukewarm engine can actually help loosen some grease, but if you’ve been sitting in traffic, give it at least an hour to rest. At MitsubishiAutoStore.com, we always advocate for safety—both for you and your machine. Waterproofing 101 Modern engines are built to withstand some moisture from the road, but they aren’t designed for a direct deluge. Take ten minutes to protect the “vital organs”: The Alternator: This is an electrical powerhouse. Wrap it in a plastic grocery bag or aluminum foil to keep water out of its internal coils. The Air Intake: Ensure no water gets into your air filter box. A plastic bag secured with a rubber band works perfectly. Electrical Connectors & Spark Plug Wells: While mostly sealed, older vehicles benefit from a little extra shielding on exposed wire bundles. Your Detailing Toolkit You don’t need a professional garage to get a pro result. Gather these essentials: High-Quality Degreaser: Look for a specialized automotive formula that breaks down oil without eating into your rubber hoses. Soft-Bristled Brushes: A variety of sizes—like an old paintbrush and a dedicated detail brush—help you reach into those tight nooks and crannies. Microfiber Towels: Essential for the drying phase to prevent water spots. Low-Pressure Water: A standard garden hose is your friend. Avoid the temptation of a high-pressure washer, which can force water past seals and into places it was never meant to go. By taking these steps, you’re ensuring that your engine cleaning session is 100% risk-free. Ready to get your hands a little dirty? Step-by-Step: The Deep Clean Process Once your sensitive electronics are shielded, it’s time to roll up your sleeves. Mastering how to clean a car engine is a systematic process. If you follow these four steps, you’ll transform a grimy engine bay into a professional-looking masterpiece without risking a “Check Engine” light. Step 1: The Dry Brush Before you introduce a single drop of water, start with a “dry” pass. Use a soft-bristled brush or even a handheld vacuum to remove loose leaves, pine needles, and dust from the corners of the bay and near the base of the windshield. If you get these wet first, they turn into a soggy, muddy mess that is twice as hard to remove. This simple step ensures you’re only dealing with the grease that’s actually stuck to the engine. Step 2: The Degreaser Application Now, apply your specialized automotive degreaser. Start from the bottom and work your way up to ensure full coverage. Focus on the heaviest grime areas—usually around the lower engine block and fluid reservoirs. Pro Tip: Try to avoid spraying the degreaser directly onto your rubber drive belts. While most modern degreasers are safe, keeping them off the belts prevents future slipping or squeaking. Let the solution sit for about 3–5 minutes (but don’t let it dry!) to allow the chemistry to break down the oil bonds. Step 3: Agitation (The Secret Sauce) This is where the magic happens. A degreaser can only do so much on its own. Use your small detail brushes to agitate the fluid in the tightest spots—around bolt heads, intake manifolds, and plastic covers. You’ll see the “baked-on” sludge turn into a liquid slurry. This human touch is what separates a “quick spray” from a professional-grade detail. Step 4: The Gentle Rinse When it’s time to rinse, reach for a standard garden hose with a spray nozzle on a light “shower” or “mist” setting. Avoid pressure washers at all costs. High-pressure streams can blast water past gaskets, into spark plug wells, or through electrical weather stripping. A gentle, low-pressure rinse is all you need to wash away the loosened grime. By the end of this rinse, you’ll see the true color of your engine components for the first time in years. At MitsubishiAutoStore.com, we love seeing a clean bay because it makes identifying future leaks—and fixing them—easier than ever. The Drying Phase: Preventing Water Spots