How to Add Brake Fluid to Your Car (Step-by-Step Guide Every Driver Needs)
You press the brake pedal and something feels… off. Maybe it’s softer than usual. Maybe the warning light just blinked at you from the dashboard. Or maybe you’re just doing routine maintenance and want to stay ahead of problems before they become expensive.
Whatever brought you here, you’re in the right place.
Adding brake fluid is one of the most underrated DIY car maintenance tasks out there. It takes about 10 minutes, costs next to nothing, and can literally save your life — because working brakes aren’t optional. Yet a surprising number of car owners have never opened their hood to check this fluid, let alone top it up.
How to add brake fluid to car guide walks you through the entire process in plain language — no mechanic jargon, no unnecessary fluff. Just the real, practical steps that work.
Why Brake Fluid Matters More Than You Think
Before we get into the how, let’s talk about the why — because understanding what brake fluid actually does makes you a much more careful owner.
Your braking system is hydraulic. When you press the brake pedal, you’re applying force that gets transferred through brake fluid to the calipers, which then squeeze against the rotors to slow down your car. If there isn’t enough fluid in the system, that force doesn’t transfer properly. Your braking distance increases. Pedal response becomes mushy. In severe cases, brakes can fail entirely.
Brake fluid also absorbs moisture over time. This is actually a designed feature — it keeps water from pooling in the brake lines and causing corrosion. But as it absorbs moisture, its boiling point drops. Under hard braking or repeated stops (think mountain driving or track days), overheated fluid can vaporize and create air pockets in the lines. That’s called “brake fade,” and it’s as scary as it sounds.
The bottom line: brake fluid is a critical safety component, not a background detail.
What You’ll Need Before You Start
You don’t need a garage full of tools. Here’s the complete list:
- The correct brake fluid for your vehicle (check your owner’s manual — most modern cars use DOT 3 or DOT 4)
- A clean rag or paper towels
- Nitrile gloves (brake fluid strips paint and irritates skin)
- A small flashlight if your engine bay is dark
- A turkey baster or fluid transfer pump (optional, but useful if you need to remove old fluid)
One critical note on fluid types: never mix DOT 3 and DOT 5. DOT 5 is silicone-based and completely incompatible with glycol-based fluids like DOT 3 and DOT 4. If you’re unsure what’s already in your car, check the reservoir cap — it’s usually printed right on it. When in doubt, consult your owner’s manual.
For Mitsubishi owners specifically (Eclipse, Lancer Evolution, Galant, Outlander), most models call for DOT 3 or DOT 4 glycol-based fluid. Always verify for your specific year and model.
Step-by-Step: How to Add Brake Fluid to Your Car
Step 1: Park on a Level Surface and Let the Engine Cool
How to add brake fluid to car matters more than people realize. An uneven surface can give you a false reading on the fluid level. A hot engine isn’t dangerous for this particular job, but it’s good practice — and a hot brake master cylinder means the fluid inside is also hot and potentially pressurized.
Park on flat ground, turn off the engine, and wait at least 10–15 minutes before opening the hood.
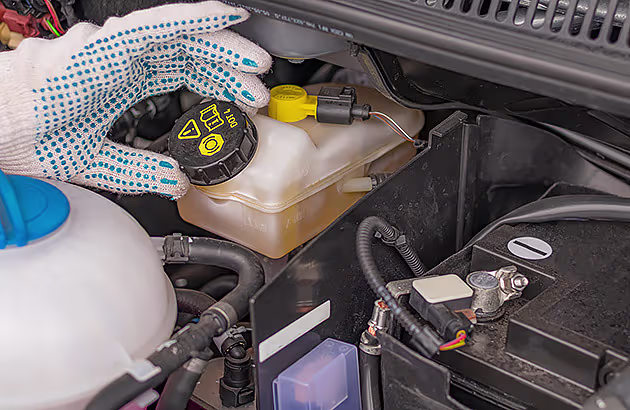
Step 2: Open the Hood and Locate the Brake Fluid Reservoir
The brake master cylinder reservoir is almost always located near the back of the engine bay, on the driver’s side, close to the firewall. It’s a small translucent plastic container — usually white or light grey — with a screw-top cap.
On most Mitsubishi models including the Lancer, Outlander, and Galant, the reservoir is clearly visible and sits on top of the brake master cylinder. You’ll often see the brake warning symbol on the cap.
Here’s a quick tip: most reservoirs are translucent enough that you can see the fluid level without even opening the cap. Look for the MIN and MAX lines marked on the outside of the container.
Step 3: Clean Around the Cap Before Opening It
How to add brake fluid to car step is small but important. Use a clean rag to wipe around the reservoir cap before unscrewing it. Even a tiny amount of dirt or debris falling into the brake fluid can contaminate the whole system.
Brake fluid is hygroscopic — it pulls in moisture — so the longer that cap is off, the more moisture exposure you risk. Work quickly and deliberately.
Step 4: Check the Current Fluid Level
Look at the side of the reservoir. There are two lines:
- MAX (or FULL): How to add brake fluid to car is the upper limit. Never fill above this line.
- MIN (or LOW): If the fluid is at or below this line, you definitely need to add more.
Healthy brake fluid should also be relatively clear to light yellow in color. If it looks dark brown or murky, it’s due for a full flush — just topping it up isn’t enough at that point. Make a note to have it flushed soon.
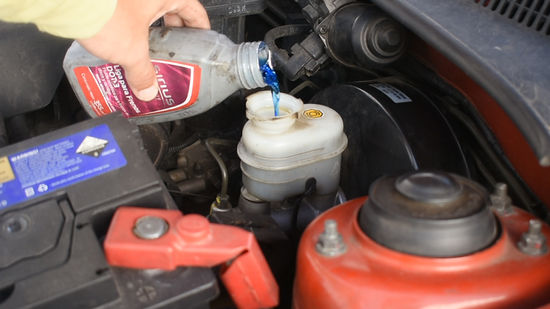
Step 5: Open the Reservoir and Add Brake Fluid
Unscrew the cap — how to add brake fluid to car usually just twists off — and set it aside on a clean surface (never face-down on the ground where it can pick up grit).
Pour the brake fluid slowly into the reservoir using the bottle’s built-in spout or a clean funnel. Add a small amount at a time and check the level frequently. You’re aiming for just below the MAX line — not over how to add brake fluid to car.
If you spill any fluid on painted surfaces, immediately wipe it off. Brake fluid will strip paint, and it doesn’t take long.
Step 6: Replace the Cap and Check for Leaks
Screw the cap back on firmly. Then give the reservoir and the surrounding brake lines a quick visual inspection. Look for any wet spots, staining, or obvious drips around the master cylinder, brake lines, or wheel area.
If you’re consistently low on brake fluid and there are no visible leaks, the fluid may be getting consumed by worn brake pads (as pads wear down, the caliper pistons extend further, drawing more fluid from the reservoir). Check your pad thickness if this keeps happening.
Step 7: Test Your Brakes Before Driving
Don’t just jump in and drive away. With the car still parked, press the brake pedal a few times and feel for firmness. It should feel solid and consistent. If the pedal feels spongy, sinks to the floor, or doesn’t behave normally, there may be air in the lines — a situation that requires bleeding the brakes, which is a separate process best handled by a qualified mechanic.
Assuming the pedal feels normal, you’re good to go. Take it easy for the first few miles and pay attention to how the brakes feel.
How Often Should You Check Brake Fluid?
At minimum, check your brake fluid every six months — or every time you check your other fluids (oil, coolant, power steering fluid). Most manufacturers also recommend a full brake fluid flush every two years or roughly 24,000 miles, whichever comes first.
Here’s a simple rule of thumb: if your car is due for an oil change, peek at the brake fluid while you’re in there. It takes 30 seconds and it’s one of the highest-value safety checks you can do.
Warning Signs That Mean Something More Serious
Topping off the fluid is a routine maintenance task. But certain warning signs tell you that something deeper is wrong:
Spongy or soft brake pedal: Air in the brake lines, a failing master cylinder, or a brake fluid leak. Don’t drive until this is diagnosed.
Brake fluid keeps disappearing: If you’re topping up every few weeks, you have a leak somewhere in the system. Common locations include the master cylinder, calipers, wheel cylinders, and brake lines. This needs immediate professional attention.
Dark, dirty fluid: Old, contaminated fluid that has absorbed too much moisture. Schedule a brake flush, not just a top-up.
Grinding or squealing when braking: Likely unrelated to the fluid itself — this points to worn brake pads or damaged rotors. Get it checked before it becomes a rotor replacement.
ABS warning light stays on: Could indicate an ABS sensor issue, but also sometimes triggered by low brake fluid. Check the fluid level first; if it’s fine, have the system scanned for fault codes.
A Special Note for Mitsubishi Owners
If you drive a Mitsubishi — whether how to add brake fluid to car is a classic Galant, a sporty Eclipse, a high-performance Lancer Evolution, or a family-friendly Outlander — your braking system works harder than average because Mitsubishi engineers these cars for responsive, confident handling.
The Lancer Evolution, in particular, is a track-capable machine with high-performance Brembo brake setups in higher trims. These systems generate significant heat under hard braking, which is exactly why using quality fluid and maintaining it properly is even more critical. Many Evo owners upgrade to DOT 4 or even DOT 5.1 (which is glycol-based and compatible with DOT 3/4 systems) to raise the boiling point.
For Outlander and Galant owners doing mostly city driving, standard DOT 3 maintained on a regular schedule is perfectly adequate.
Regardless of model, here are Mitsubishi-specific tips:
- Always verify your DOT specification in the owner’s manual — it’s printed clearly in the maintenance section.
- Mitsubishi reservoir caps are finger-tight — don’t over-torque them.
- If you’ve bought used parts (like calipers or a master cylinder), always flush and replace the fluid in that circuit before driving.
Can You Drive with Low Brake Fluid?
Honestly? You can — but you absolutely shouldn’t.
Low brake fluid means reduced hydraulic pressure in the system. Your braking distance will increase. Your pedal may feel softer. And if the level drops far enough, air enters the lines and you could experience partial or total brake failure.
There’s no emergency situation that justifies driving with critically low brake fluid except driving slowly to the nearest service station to get it fixed. If the brake warning light is on and your fluid is at the MIN line or below, pull over somewhere safe and call for assistance or a tow if needed.
Getting the Right Parts for Your Mitsubishi Braking System
Topping up brake fluid is easy and cheap. But what about the rest of your braking system? Calipers, rotors, master cylinders, and brake lines all wear over time — and using the wrong parts on a Mitsubishi can affect both performance and safety.
That’s where Mitsubishi Autostore comes in.
Mitsubishi Autostore specializes exclusively in premium, high-quality spare parts engineered specifically for Mitsubishi vehicles. Whether you’re restoring a Galant, upgrading an Eclipse, building out a Lancer Evolution, or maintaining an Outlander, their inventory covers everything from engine components and performance rims to body panels and suspension systems.
What sets them apart:
- Guaranteed Fitment: Every part is vetted for compatibility with your specific Mitsubishi model. No guessing, no returns, no headaches.
- Premium Quality Standards: Parts that meet or exceed original Mitsubishi performance specifications.
- Fast, Transparent Shipping: Real-time order tracking from their warehouse in Trenton, NJ, to your doorstep.
- Expert Support: Their team knows Mitsubishi vehicles inside and out. If you’re not sure which brake caliper fits your Evo 9 or which master cylinder is right for your Outlander, they can tell you.
They carry some impressive braking components — including the Alcon 6-piston calipers and 343mm 2-piece rotors for Evo 9 (front brakes) and AP Racing CP9560/CP9540 6/4-pot setups for the Lancer Evolution — the kind of hardware that serious drivers put on track-ready builds.
You can explore their full inventory at mitsubishiautostore.com or reach them directly at +1(681)6902353 or info@mitsubishiautostore.com.
Quick Reference: Brake Fluid Types at a Glance
| Fluid Type | Base | Boiling Point (Dry) | Common Use |
|---|---|---|---|
| DOT 3 | Glycol | 205°C (401°F) | Standard passenger cars |
| DOT 4 | Glycol | 230°C (446°F) | Performance vehicles, heavier use |
| DOT 5 | Silicone | 260°C (500°F) | Classic/show cars; NOT for ABS systems |
| DOT 5.1 | Glycol | 260°C (500°F) | High-performance; compatible with DOT 3/4 |
Most Mitsubishi owners will use DOT 3 or DOT 4. Check your cap and your owner’s manual before buying.
Final Thoughts
Knowing how to add brake fluid to your car is a simple, genuine skill that keeps you safer and saves money over time. The process itself takes under 15 minutes. The cost of a bottle of DOT 4 is a few dollars. The cost of not maintaining your braking system can be devastating.
Check your fluid regularly. Flush it every two years. Pay attention to how your brakes feel. And when something doesn’t feel right — a soft pedal, a warning light, fluid that keeps disappearing — don’t ignore it. Address it early, and you’ll spend far less than if you wait.
If your Mitsubishi needs more than just a top-up — if it’s time for new calipers, upgraded rotors, or any other genuine Mitsubishi components — visit Mitsubishi Autostore for parts you can trust, delivered fast, with experts who know your vehicle.Drive safe out there.