How to Fix Scratched Rims on Your Car: A Step-by-Step Repair Guide
There’s a specific sound every driver dreads — that scrape of metal against concrete as a wheel kisses the curb a little too closely. You glance down, and there it is: a pale gouge cutting through the finish, right where everyone parked next to you will see it. The good news is that most scratched rims, often called curb rash, are entirely fixable, and in many cases you don’t even need a body shop to do it.
This guide walks through exactly how to assess the damage, what it takes to fix it yourself, when a professional is worth the money, and when repair isn’t the right call at all.
Can You Actually Fix a Scratched Rim?
Yes, in the vast majority of cases. Light surface scratches can often be polished out in under an hour with no painting required. Deeper curb rash — the kind that’s actually gouged into the metal — needs sanding, filler, primer, paint, and clear coat, and typically takes an afternoon if you’re doing it yourself, or runs $75 to $250 per wheel at a shop. The one thing that’s not fixable through cosmetic repair is a wheel that’s cracked or bent badly enough to leak air or cause vibration; that calls for replacement, not repair.
Step 1: Figure Out What Kind of Damage You’re Actually Dealing With
Before buying a single product, run your fingernail across the damaged area. This five-second check determines your entire approach.
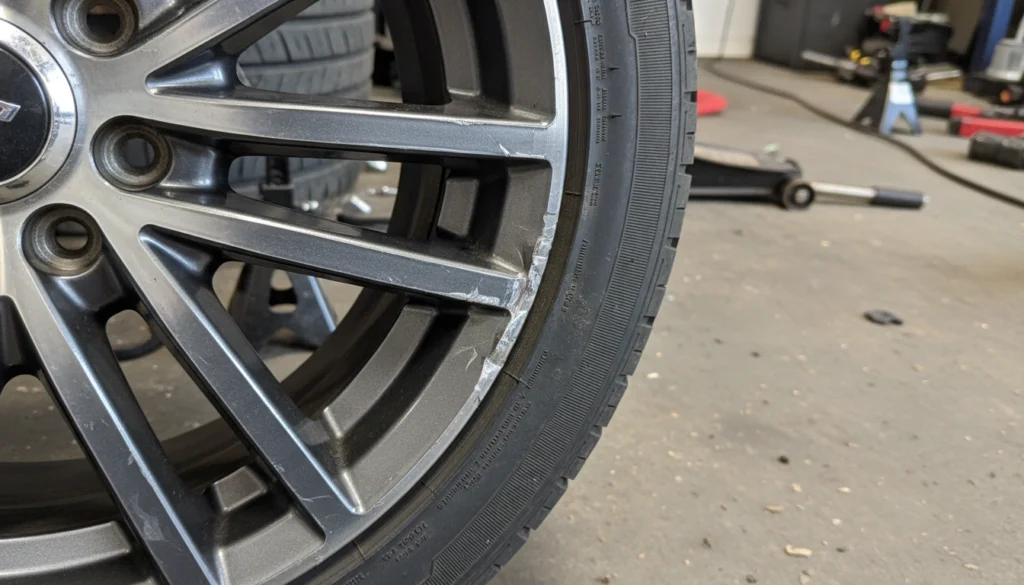
Surface scuffs: If the area is just discolored or has light surface marks but feels smooth to the touch, you’re dealing with cosmetic scuffing only. A rim polish or scratch remover can often buff this out without any sanding or painting at all.
Curb rash (gouged but not structural): If you can feel a groove or rough edge where metal has actually been scraped away, but the wheel still holds air fine and the car doesn’t shake, this is the classic sand-fill-paint repair job described below.
Structural damage: If you see an actual crack, hear a hissing sound near the rim (a sign of a slow air leak), or feel a vibration through the steering wheel at speed, stop here. That’s not a cosmetic problem, and no amount of filler or paint makes a cracked or badly bent wheel safe to drive on. That wheel needs professional inspection, and likely replacement.
This sorting step matters because it’s the single biggest factor in whether your repair lasts. Filling a deep gouge as if it were a light scuff is the most common reason DIY rim repairs look fine for a few weeks and then start flaking.
Step 2: Gather Your Materials
For a typical curb rash repair on one wheel, here’s what you’ll need and roughly what it costs:
| Item | Approximate Cost |
|---|---|
| Wheel cleaner / degreaser | $8–$15 |
| Sandpaper (assorted grits: 220, 400, 800, 2000) | $10–$20 |
| Alloy wheel filler/putty | $10–$20 |
| Automotive primer (etching primer for aluminum) | $10–$15 per can |
| Color-matched touch-up paint | $20–$50 per can |
| Clear coat spray | $10–$20 per can |
| Painter’s tape and masking film | $5–$10 |
| Polishing compound | $10–$25 |
All in, a complete DIY repair kit for one wheel typically runs $30 to $135 depending on how much you already have on hand and how particular you are about color matching. Pre-bundled alloy wheel repair kits that include most of this in one box are also widely available and tend to land in that same range.
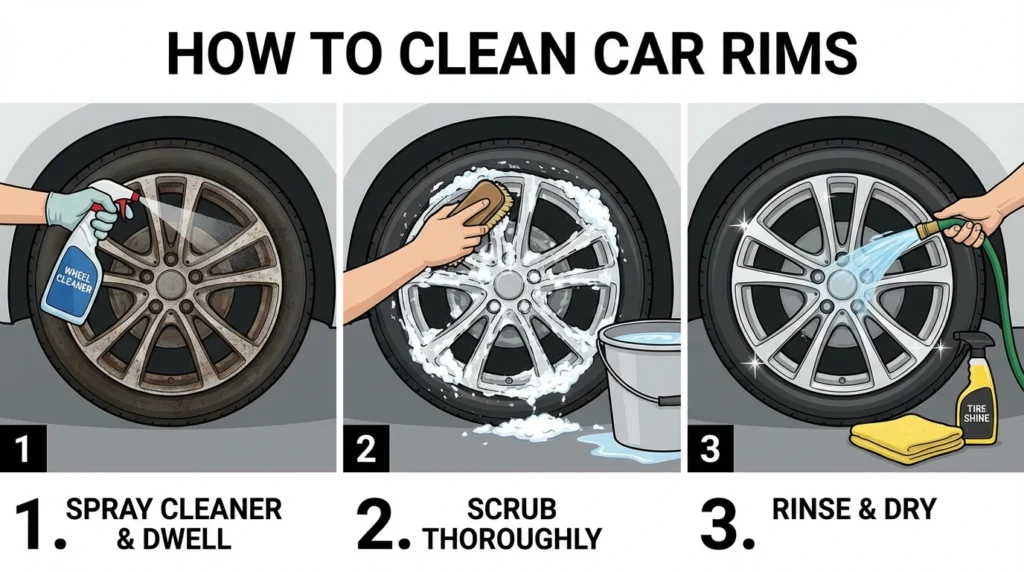
Step 3: Clean and Assess
Wash the wheel thoroughly with soap, water, and a dedicated wheel degreaser to strip away brake dust, road grime, and any wax or sealant. Brake dust in particular is slightly abrasive and acidic, and if it’s not fully removed before sanding, it gets ground into the surface rather than off it. Dry the wheel completely, then wipe the damaged area with rubbing alcohol so you’re working on a truly clean surface.
Step 4: Mask the Tire
Use painter’s tape around the edge of the tire, then add a layer of plastic sheeting or a trash bag to keep sanding dust and overspray off the rubber. Some people slide index cards or thin plastic between the tire bead and rim lip as an extra barrier. This step is easy to rush, but skipping it means cleaning paint overspray off your tire later, which is far more annoying than five extra minutes of taping now.
Step 5: Sand the Damaged Area
This is where most of the actual work happens. Start with a coarser grit — 220 to 400 — to knock down the raised edges of the gouge and remove any clear coat in the area. You’ll notice the sanding dust changes color: white or chalky dust usually means you’re cutting through clear coat, while gray metallic dust means you’ve reached the bare alloy. Keep sanding outward in a feathering motion about half an inch beyond the visible damage so the repaired area blends smoothly into the surrounding finish rather than leaving a visible ring.
Once the gouge itself is smoothed out, step up to progressively finer grits — 800, then 2000 — to remove the scratch pattern left by the coarser paper. Wipe away dust with a damp cloth between grits so you can actually see your progress instead of sanding through a layer of debris.
Step 6: Fill Deeper Gouges
If sanding alone hasn’t gotten the area level — which is common with anything deeper than a surface scuff — apply a thin layer of alloy wheel filler or metal-reinforced putty directly into the gouge. Spread it slightly above the surrounding surface, since it will need to be sanded back down once it cures. Follow the product’s stated cure time exactly; rushing this step is one of the most common reasons DIY repairs fail, since paint applied over uncured filler can crack or bubble later.
Once cured, sand the filled area flush using the same progression of grits as before, finishing with a fine grit so the filled section feels seamless against the rest of the wheel by touch, not just by eye.
Step 7: Prime, Paint, and Clear Coat
Apply a thin coat of self-etching primer designed for aluminum or alloy surfaces — this is what allows the new paint to actually bond to bare metal instead of flaking off within a few months. Let it dry fully per the can’s instructions, then apply your color-matched paint in two to three thin coats rather than one heavy coat, allowing drying time between each. Thin layers cure more evenly and are far less likely to run or show texture than one thick application.
Finish with two to three light coats of clear coat to seal and protect the new paint. This layer is what gives the repair its shine and is also your main defense against brake dust and road salt working their way back into the repaired area.
Step 8: Cure and Polish
Let the wheel sit untouched for at least 24 hours before driving on it — rushing this step is the single most common reason a fresh repair gets dinged again almost immediately. Once fully cured, buff the area with a polishing compound and a soft cloth to bring back the shine and blend the repaired section with the rest of the wheel.
When the Damage Doesn’t Need Paint at All
Not every scratch needs the full process above. If the fingernail test from Step 1 came back smooth — meaning the damage is purely cosmetic discoloration rather than an actual gouge — skip straight to a quality rim polish or scratch remover. These products are designed to buff out light surface marks without sanding or touching the paint at all, and they’re worth trying first since they take a fraction of the time.
DIY vs. Professional Repair: What You’re Actually Paying For
| DIY | Professional Shop | |
|---|---|---|
| Cost per wheel | $30–$135 (materials, reusable across multiple repairs) | $75–$250 depending on material and damage |
| Time | 3–6 hours including dry time | Often same-day or next-day |
| Color match | Can be imperfect without experience | Typically exact, color-matched in-house |
| Best for | Light-to-moderate curb rash, budget-conscious owners | Deep gouges, chrome wheels, high-end finishes, or anyone short on time |
Chrome wheels are worth calling out specifically: the re-plating process they require isn’t something you can replicate with a home kit, and professional chrome repair typically runs $100 to $250 per wheel because of the specialized equipment involved.
When Repair Isn’t the Right Call
If a wheel has an actual crack rather than a gouge, or it’s bent badly enough to cause a vibration at speed or a slow air leak, no cosmetic repair makes that wheel safe. Cracked and severely bent wheels need to be replaced, not patched. This is also the point where it’s worth weighing the cost of repeated repairs against simply replacing the wheel, especially on an older set that’s already been refinished once or twice — at some point, a fresh, full-strength wheel becomes the more sensible option than a third round of filler and paint on the same one.
If you’re driving a Mitsubishi and you’ve reached that point — whether it’s a Lancer, Lancer Evolution, Eclipse, Galant, or Outlander — Mitsubishi Autostore carries replacement and performance rim sets sized for these platforms, which is often simpler than chasing down a single matching OEM wheel from a dealer parts counter. Their rims selection covers common bolt patterns for these models, so if repair has reached the point of diminishing returns, replacement is just a few clicks away rather than a parts-hunting project of its own.
How to Avoid Doing This Again
A little prevention goes a long way toward keeping your wheels looking good between repairs:
- Give curbs more room than feels necessary, especially when parallel parking or pulling into angled spots — most curb rash happens at low speed during routine parking, not dramatic driving.
- Use a wheel protectant or sealant after any repair or cleaning. This invisible layer helps repel brake dust and road grime, which makes future cleaning easier and slows the buildup that leads to corrosion in scratched areas.
- Check tire pressure regularly. An underinflated tire sits lower and gives you less clearance from curbs and potholes than you’d expect.
- Be extra cautious with larger wheels. Bigger diameters and lower-profile tires mean less cushion between the rim’s edge and the road, so the margin for error shrinks as wheel size goes up.
Can I drive on a scratched rim while I plan the repair?
Yes, as long as the scratch is cosmetic only — meaning no air leak, no vibration, and no visible crack. Purely cosmetic curb rash doesn’t affect drivability, so there’s no rush beyond wanting it to look better.
Will touch-up paint match my factory wheel color exactly?
It can come close, but an exact match usually requires either an OEM-matched paint code or a professional shop with color-matching equipment. DIY repairs are sometimes slightly visible up close even when they look great from a normal viewing distance.
How long does a DIY rim repair actually take?
Budget half a day when you include drying time between primer, paint, and clear coat layers — the active hands-on work is usually 1 to 2 hours, but rushing the cure times between steps is the most common cause of a repair that doesn’t hold up.
Is it cheaper to repair or replace a scratched rim?
For light-to-moderate curb rash, repair is almost always cheaper, often by a wide margin. Replacement becomes the more sensible math once a wheel has cracked, bent, or already been refinished multiple times in the same spot.
Do scratched rims affect resale value?
Yes, noticeably. Curb rash is one of the first things a buyer or appraiser notices walking up to a car, and addressing it before a sale or trade-in is one of the better-value cosmetic fixes you can make.
The Bottom Line
Most scratched rims are a cosmetic problem with a genuinely accessible fix — clean, sand, fill if needed, prime, paint, clear coat, and polish, in that order, with patience at each drying stage. The only damage that calls for replacement instead of repair is anything structural: a crack, a bend that causes vibration, or a slow leak. Sort your damage correctly at the start, respect the cure times along the way, and a curbed wheel that looked like a write-off can genuinely come back looking factory-fresh.