How to Repair Leather Car Seats: The Complete DIY Guide to Fix Cracks, Tears & Wear
Leather car seats add a premium feel to any vehicle. They look elegant, feel comfortable, and can even increase resale value. However, over time, daily use, sunlight exposure, spills, and temperature changes can cause leather seats to crack, fade, tear, or become worn out.
The good news is that you don’t always need to replace your seats or pay expensive upholstery repair costs. Many common leather seat problems can be repaired at home with the right tools, techniques, and a little patience.
In this complete guide, you’ll learn exactly how to repair leather car seats, fix cracks and tears, restore faded leather, and keep your vehicle’s interior looking like new for years to come.
Why Leather Car Seats Get Damaged
Before starting repairs, it’s important to understand what causes leather deterioration.
Common causes include:
- UV sun exposure
- Extreme heat and cold
- Daily friction from entering and exiting the vehicle
- Sharp objects such as keys and belt buckles
- Food and liquid spills
- Lack of cleaning and conditioning
- Aging leather materials
Regular cleaning and conditioning can significantly slow down damage and help maintain softness and flexibility.
Signs Your Leather Seats Need Repair
Look for these warning signs:
Small Cracks
Early-stage cracking usually appears on the driver’s seat due to constant use.
Surface Scratches
Keys, pets, and clothing accessories can leave visible marks.
Fading Color
UV rays gradually remove color and moisture from leather.
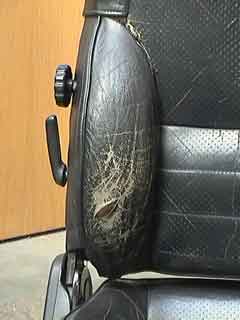
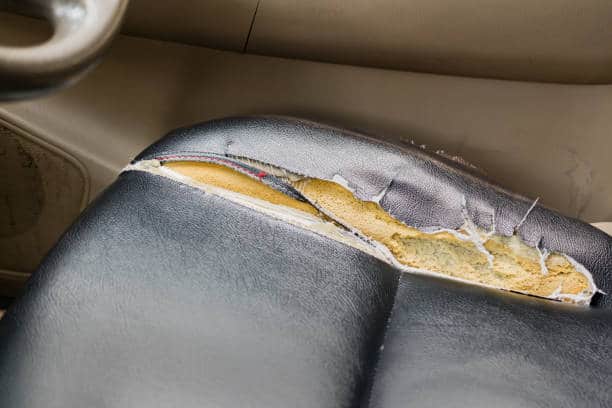
Tears and Holes
Small tears can quickly become major damage if ignored.
Dry and Stiff Leather
Leather naturally loses oils over time and becomes brittle.
Tools and Materials You’ll Need
For most DIY leather seat repairs, gather:
- Leather cleaner
- Leather conditioner
- Microfiber towels
- Soft-bristle brush
- Leather repair kit
- Leather filler
- Sandpaper (fine grit)
- Leather adhesive
- Leather colorant or dye
- Heat gun or hair dryer
- Leather sealant
Having quality materials can dramatically improve repair results.
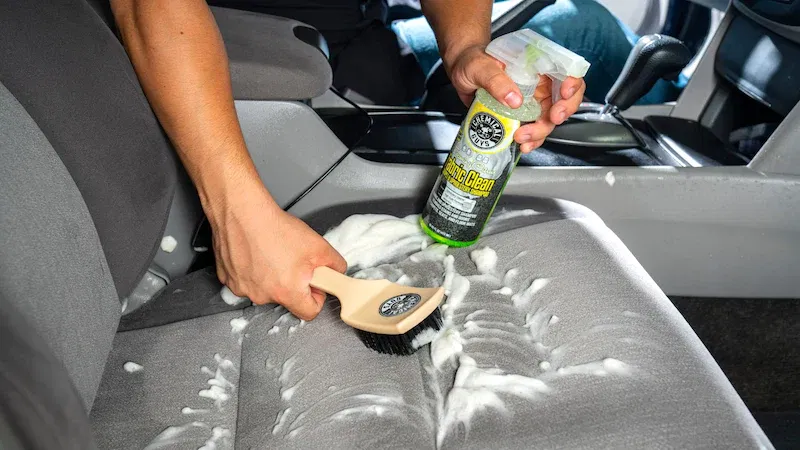
Step 1: Clean the Leather Thoroughly
Never repair dirty leather.
Dirt trapped beneath fillers, dyes, or conditioners can prevent proper adhesion and worsen damage later. Experts recommend cleaning before any restoration process.
Cleaning Process
- Vacuum the seats.
- Remove debris from seams.
- Apply a pH-balanced leather cleaner.
- Use a soft brush for stubborn dirt.
- Wipe with a microfiber towel.
- Allow the seat to dry completely.
Avoid household cleaners, bleach, alcohol, or ammonia-based products because they can damage protective coatings.
Step 2: Repair Minor Leather Scratches
Light scratches are among the easiest problems to fix.
Method
- Clean the affected area.
- Apply leather conditioner.
- Rub gently using circular motions.
- Buff with a microfiber cloth.
Many minor scratches disappear once moisture is restored to the leather surface.
Step 3: Fix Cracked Leather Car Seats
Cracks are common in older vehicles and heavily used seats.
What You’ll Need
- Leather filler
- Fine sandpaper
- Leather dye
Repair Process
Clean the Area
Remove dirt and oils.
Sand Lightly
Smooth raised edges around the crack.
Apply Leather Filler
Use a plastic applicator to spread filler evenly.
Dry Completely
Follow product instructions.
Sand Again
Create a smooth finish.
Apply Matching Dye
Blend the repaired section with surrounding leather.
Seal the Surface
Finish with a protective leather sealant.
This method works particularly well for small and medium-sized cracks.
Step 4: How to Repair Leather Seat Tears
A tear requires immediate attention because it will continue spreading with daily use. Prompt repair can prevent more expensive restoration later.
For Small Tears
- Clean the damaged area.
- Apply leather adhesive beneath the tear.
- Press edges together.
- Let cure completely.
For Larger Tears
- Insert a backing cloth beneath the damaged area.
- Secure it using leather adhesive.
- Apply leather filler.
- Allow drying.
- Sand smooth.
- Apply matching color.
- Seal the repair.
Large tears may require multiple filler applications for the best results.
Step 5: Repair Holes in Leather Seats
Small holes from burns or punctures can often be repaired.
Procedure
- Trim loose fibers.
- Insert backing fabric.
- Glue the backing in place.
- Apply leather filler.
- Dry and sand.
- Apply dye.
- Seal for durability.
When done correctly, the repair can become nearly invisible.
Step 6: Restore Faded Leather Seats
Sun exposure is one of leather’s biggest enemies. UV damage often causes fading, dryness, and discoloration.
Restoration Steps
- Deep clean the leather.
- Remove old contaminants.
- Apply leather prep solution.
- Use matching leather dye.
- Apply several thin coats.
- Allow drying between coats.
- Finish with a leather protector.
Color restoration can dramatically improve the appearance of older interiors.
Step 7: Repair Leather Seat Creases
Creases develop from body weight and repeated use.
Method
- Clean the seat.
- Warm the leather carefully with a hair dryer.
- Massage the crease.
- Apply conditioner.
- Allow the leather to absorb moisture.
Mild heat helps relax leather fibers and reduce visible folds.
Step 8: Condition the Leather
Conditioning is essential after any repair.
Leather naturally loses moisture and oils over time. Regular conditioning helps prevent future cracking and fading.
How to Condition
- Apply conditioner to a foam applicator.
- Work evenly across the surface.
- Allow absorption.
- Buff away excess.
Most professionals recommend conditioning every 3–6 months depending on climate and usage.
Common Leather Seat Repair Mistakes
Avoid these costly mistakes:
Using Household Cleaners
They can strip protective coatings.
Skipping Cleaning Before Repair
Contaminants reduce repair effectiveness.
Applying Too Much Water
Excess moisture can damage stitching and seat foam.
Ignoring Small Cracks
Minor cracks often become major tears.
Choosing the Wrong Color Dye
Poor color matching creates noticeable repairs.
DIY vs Professional Leather Seat Repair
DIY Repair
Best For:
- Minor scratches
- Light cracks
- Small tears
- Surface fading
Pros:
- Affordable
- Convenient
- Quick
Cons:
- Requires patience
- Results depend on skill
Professional Repair
Best For:
- Large tears
- Extensive cracking
- Structural seat damage
- Luxury vehicle interiors
Pros:
- Professional finish
- Long-lasting results
Cons:
- Higher cost
If stitching, foam, or seat structure is damaged, professional upholstery repair may be the better choice.
How to Prevent Future Leather Seat Damage
Prevention is always cheaper than repair.
Park in Shade
Reduce UV exposure whenever possible.
Use Sunshades
Protect seats during hot weather.
Clean Regularly
Remove dirt before it damages the surface.
Condition Every Few Months
Maintain flexibility and moisture.
Avoid Sharp Objects
Keys, rivets, and pets can easily scratch leather.
Handle Spills Immediately
Quick cleanup prevents permanent staining.
Frequently Asked Questions
Can cracked leather seats be repaired?
Yes. Most small and medium cracks can be repaired using leather filler, dye, and conditioner.
Is repairing leather seats cheaper than replacement?
Absolutely. DIY repairs often cost a fraction of full seat replacement.
How long do leather seat repairs last?
Properly repaired and maintained leather can remain attractive for years.
Can I repair leather seats myself?
Yes. Most scratches, cracks, and minor tears are suitable DIY projects.
How often should leather seats be conditioned?
Every three to six months depending on climate and vehicle usage.
Final Thoughts
Learning how to repair leather car seats can save you hundreds of dollars while preserving your vehicle’s appearance and value. Whether you’re dealing with minor scratches, faded leather, cracks, or small tears, most problems can be fixed at home using the right products and techniques.
The key is acting early. Small imperfections are easier and cheaper to repair than severe damage. Combine regular cleaning, conditioning, and UV protection with prompt repairs, and your leather seats can continue looking luxurious for many years.
If you’re looking for professional automotive care products, maintenance advice, or vehicle accessories, Mitsubishi Auto Store offers valuable resources to help keep your vehicle in excellent condition.
Why Leather Seats Are Worth Repairing Instead of Replacing
Many car owners assume that damaged leather seats must be replaced entirely. However, replacement is often significantly more expensive than repair. A complete leather seat replacement can cost hundreds or even thousands of dollars depending on the vehicle model and leather quality.
Repairing existing leather seats offers several advantages:
- Saves money
- Maintains the vehicle’s original interior
- Increases resale value
- Reduces waste
- Extends seat lifespan
For most minor and moderate damage, professional-grade repair products can restore the seat’s appearance without the expense of replacement.
Different Types of Leather Used in Cars
Understanding your seat material helps you choose the correct repair method.
Genuine Leather
Made from real animal hide, genuine leather offers durability and a premium appearance. It requires regular conditioning to prevent drying and cracking.
Synthetic Leather
Often called faux leather or leatherette, synthetic leather is manufactured from vinyl or polyurethane materials. It is generally easier to maintain but may require different repair products.
Semi-Aniline Leather
Common in luxury vehicles, semi-aniline leather has a protective coating while retaining a natural appearance.
Full-Aniline Leather
This premium leather has minimal surface treatment and requires extra care because it is more vulnerable to stains and UV damage.
Seasonal Effects on Leather Car Seats
Weather conditions play a major role in leather deterioration.
Summer Damage
High temperatures and direct sunlight can:
- Dry out leather
- Cause fading
- Create surface cracks
- Accelerate aging
Winter Damage
Cold temperatures may:
- Make leather stiff
- Increase brittleness
- Cause cracking when pressure is applied
Using seat protectors and conditioning products throughout the year helps minimize seasonal damage.
How Long Does Leather Seat Repair Last?
One of the most common questions vehicle owners ask is whether leather repairs are permanent.
The answer depends on several factors:
- Quality of repair materials
- Severity of original damage
- Frequency of vehicle use
- Exposure to sunlight
- Maintenance routine
Minor scratch repairs can last several years, while properly repaired cracks and tears often remain intact for a long time when maintained correctly.
Regular cleaning and conditioning can significantly extend repair longevity.
Best Maintenance Routine After Repair
Once your leather seats have been repaired, following a maintenance schedule is essential.
Weekly
- Remove dust and debris
- Wipe surfaces with a microfiber cloth
Monthly
- Clean using a leather-safe cleaner
- Inspect for new scratches or cracks
Every 3–6 Months
- Apply a quality leather conditioner
- Protect against UV damage
Annually
- Perform a complete inspection
- Touch up any minor wear before it becomes severe
Consistent maintenance is the secret to keeping leather seats looking new for years.
Conclusion
Knowing how to repair leather car seats is a valuable skill for any vehicle owner. From fixing small scratches and cracks to restoring faded surfaces and repairing tears, many leather seat issues can be addressed without replacing the entire upholstery.
The most important factor is taking action early. Small cracks become larger cracks, and minor tears can quickly turn into expensive repairs if ignored. By using the proper tools, quality repair products, and regular maintenance practices, you can preserve your vehicle’s premium interior appearance and extend the life of your leather seats.
Whether you drive a daily commuter, family SUV, luxury sedan, or performance vehicle, properly maintained leather seats improve comfort, appearance, and resale value. With the techniques outlined in this guide, you can confidently restore and protect your leather interior for years to come.